Mobile-Friendly Numeric Handwriting Recognition on the Web using TensorFlow.js
Machine learning in action! Learn how to make a handwriting recognizer which uses a deep learning neural network and deploy it into your Vue.js app.
First, try it out!
https://henryjin.dev/demo/mnist/
This is a machine learning model running totally in the browser using TensorFlow.js—no external service required!
Just want the code? Here you go!
Otherwise, stick with me after the break to learn the following:
- How to create and export a basic deep learning model
- Make a mobile–friendly Vue.js demo page
Create and Export a Deep Learning Model
We're going to start by firing up Google Colab, a browser-based environment which allows you to run Python-based Jupyter Notebooks. These are the standard for machine learning in Python, and make it easy to collaborate and develop machine learning models.
Training Data
We will be using the famous MNIST dataset, which is often used in courses which teach machine learning and vision recognition. This is a dataset which consists of handwritten digits, as below:
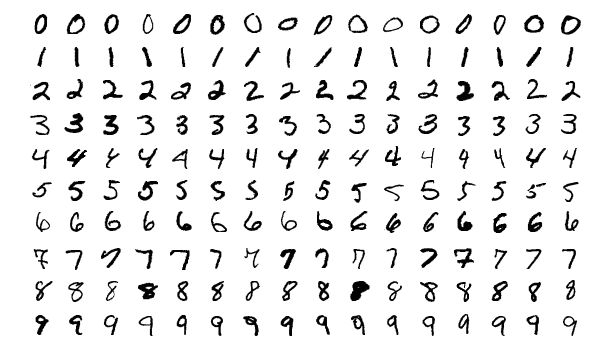 Josef Steppan CC BY-SA
I won't be going into the details of how to design the neural network itself. This is much better explained here, although some of the code needed to be updated for the latest version of TensorFlow. You can see my code here.
Exporting the Model
Once you have created your model and trained it, all you need to export it are three commands:
model.save("model.h5")

!pip install tensorflowjs

!tensorflowjs_converter --input_format keras '/content/model.h5' '/content/model'
Finally, in the left nav click on the folder icon and under the model folder you should see a model.json file as well as a group1-shard1of1.bin file. Download both of these by right-clicking and hitting "Download".
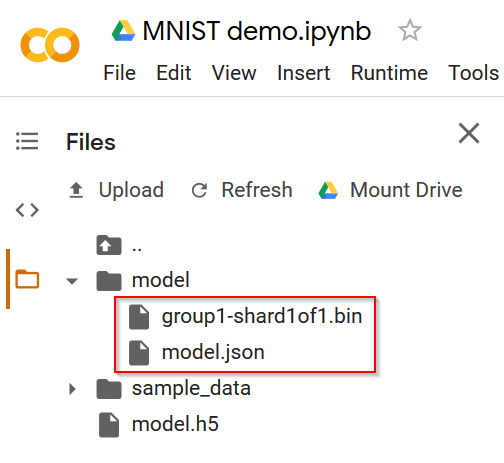
Put these files somewhere your Vue page will be able to access them. Mine are in /static/mnist/.
Make the Vue.js Demo Page
Creating the demo page takes a few steps:
- Set up the canvas component
- Track both mouse and touch events
- Transform the data and check it with an approximation output
- Load the model and use it to make a prediction
Thanks to Carlos Aguayo for providing the foundation for parts 1, 2, and 4. If you want to see his non–Vue.js based implementation, check it out here.
Canvas Setup
To allow our users to write and draw, we'll be using the HTML canvas element. Go ahead and create that, and wrap it in a div which we will need for sizing.
<div id="paint" ref="paint" class="painter">
  <canvas id="number_painter" ref="number_painter"></canvas>
</div>
We'll add the event bindings for this in the next part.
In the mounted function of your Vue component, you'll want to set up the canvas size and the paint context. The canvas needs to be a square for the ML model, so set the height equal to the width. For ease of use, I recommend adding paintContext to your data function, although you could also just get the context each time.
//set the canvas size
const paint = this.$refs.paint;
const computedStyle = getComputedStyle(paint);

this.$refs.number_painter.width = parseInt(
  computedStyle.getPropertyValue('width')
);
this.$refs.number_painter.height = this.$refs.number_painter.width;

//set up painter
this.paintContext = this.$refs.number_painter.getContext('2d');
this.paintContext.strokeStyle = 'white';
this.paintContext.lineJoin = 'round';
this.paintContext.lineCap = 'round';
this.paintContext.lineWidth = 50;
Mouse and Touch Events
First, let's create a helper method to let us properly calculate where on the canvas our user is clicking/touching. You'll need to account for both the page offset as well as the user's scroll position. Place this in the methods property of your Vue component.
setMouseWithOffset(e) {
  const bounds = this.$refs.paint.getBoundingClientRect();

  // account for initial canvas position in relation to other elements on the page
  const pageOffsetLeft = bounds.left + window.pageXOffset;
  const pageOffsetTop = bounds.top + window.pageYOffset;

  // and also account for scrolling
  this.mouse.x = e.clientX - pageOffsetLeft + window.scrollX;
  this.mouse.y = e.clientY - pageOffsetTop + window.scrollY;
},
Then, let's create our basic mouse events. After creating an isPainting attribute in our data function, create the startPaint method. This happens when the user first clicks or touches, and begins painting.
startPaint(e) {
  this.isPainting = true;
  this.paintContext.beginPath();
  this.setMouseWithOffset(e);
  this.paintContext.moveTo(this.mouse.x, this.mouse.y);
},
Next, let's create the keepPainting method, which updates the mouse position and current stroke.
keepPainting(e) {
  this.setMouseWithOffset(e);
  if (this.isPainting) {
    this.paintContext.lineTo(this.mouse.x, this.mouse.y);
    this.paintContext.stroke();
  }
},
Now to our last mouse event, endPaint. We'll be adding to this later.
endPaint(e) {
  this.isPainting = false;
}
Now let's bind them up to our canvas object.
<canvas
  id="number_painter"
  ref="number_painter"
  @mousedown="startPaint"
  @mousemove="keepPainting"
  @mouseup="endPaint"
></canvas>
With these in place, let's make our canvas mobile–friendly with touch events. The code for this is pretty basic, just one helper function. This prevents scrolling while touching (for iOS devices) and dispatches the mouse events that we already hooked up.
touchEventConverter(e, eventString) {
  e.preventDefault();
  const touch = e.touches[0];

  let newParams = {};
  if (touch) {
    newParams = {
      clientX: touch.clientX,
      clientY: touch.clientY
    };
  }
  this.$refs.number_painter.dispatchEvent(
    new MouseEvent(eventString, newParams)
  );
}
And let's bind it! We'll take advantage of Vue's ability to pass in arguments so we can bind the helper function directly.
<canvas
  id="number_painter"
  ref="number_painter"
  @mousedown="startPaint"
  @mousemove="keepPainting"
  @mouseup="endPaint"
  @touchstart="touchEventConverter($event, 'mousedown')"
  @touchmove="touchEventConverter($event, 'mousemove')"
  @touchend="touchEventConverter($event, 'mouseup')"
></canvas>
Go ahead and try it out now! You should be able to draw on your canvas with both mouse and touch events.
Data Transformation and Approximation Output
In order to feed the handwriting input to our machine learning model, we need to scale down the image to 28x28 and convert from RGBA to grayscale. We'll be taking advantage of the ability of the drawImage function to scale our image.
Before we just feed this data to our model, we'll output it to a 10x size approximation canvas so we can verify that the data transformation is working. Go ahead and set up another canvas.
<canvas id="approx_painter" ref="approx_painter"></canvas>
In the mounted function, set up the size. I've also set up component–level constants for ease of use.
const MODEL_INPUT_SIZE = 28;
const APPROX_IMAGE_MULTIPLIER = 10;
//set up painter for image approximation
this.$refs.approx_painter.width = MODEL_INPUT_SIZE * APPROX_IMAGE_MULTIPLIER;
this.$refs.approx_painter.height = MODEL_INPUT_SIZE * APPROX_IMAGE_MULTIPLIER;
this.approxContext = this.$refs.approx_painter.getContext('2d');
Now let's scale down the image first. We'll clear out a space on our new canvas, scale down the image, and get the scaled-down data.
this.approxContext.clearRect(0, 0, MODEL_INPUT_SIZE, MODEL_INPUT_SIZE);

// scale down the handwritten image
this.approxContext.drawImage(
  this.$refs.number_painter,
  0,
  0,
  MODEL_INPUT_SIZE,
  MODEL_INPUT_SIZE
);

// get the scaled image data out
const data = this.approxContext.getImageData(
  0,
  0,
  MODEL_INPUT_SIZE,
  MODEL_INPUT_SIZE
).data;
Now let's create an input vector, removing RGBA data.
var input = [];
for (var i = 0; i < data.length; i += 4) {
  input.push(data[i + 2] / 255);
}
We've successfully transformed our data and created our input vector! But first, let's draw it to the approximation canvas. I've placed this in the drawApproximation function in my code.
Now, when you draw a number, you should see what the machine learning model will see pop up on your second canvas. Finally, let's get to the good part—actually predicting the digit!
Load and Use Our TensorFlow Model
First, we'll need to load the TensorFlow.js script. I've done this via the mounted component:
//load tensorflow script only for this component
const tensorflow = document.createElement('script');
tensorflow.setAttribute(
  'src',
  'https://cdn.jsdelivr.net/npm/@tensorflow/tfjs@1.5.2/dist/tf.min.js'
);
document.head.appendChild(tensorflow);
With this, you now have access to the tf variable. We'll use this to load our model. Since loading the model can take a couple seconds, let's only do it once. Create a model property in your data function.
Next, let's get to the prediction. Create an async helper function which takes the input vector we created in the last part.
async predict(input) {
Next, check if we've already loaded the model. If not, load it!
Note, I clean up TensorFlow here too. This only affects you during development if you are using hot reloading, and is just for convenience.
if (!this.model) {
  //clear up TensorFlow since during hot reloading it's still there
  tf.disposeVariables();

  this.model = await tf.loadLayersModel('/mnist/model.json');
}
Finally, let's get out our predicted scores. We'll resize the input vector to match our model, use it to predict, and then get the max probability out of the output vector to tell us which digit our model is predicting.
let scores = await this.model
  .predict([
    tf.tensor(input).reshape([1, MODEL_INPUT_SIZE, MODEL_INPUT_SIZE, 1])
  ])
  .array();
scores = scores[0];
this.predicted = scores.indexOf(Math.max(...scores));
Set up the predicted property in your data function, and then add it to your template like so:
<h2>{{ predicted }}</h2>
Or display it however you like!
Conclusion
We've written a TensorFlow model in Python, created a mobile-friendly canvas in Vue.js, and used TensorFlow.js to take the input of that canvas and predict what number has been written. And it all works in the browser, no external service needed. Good work!
Now take a quick break and just play around with it for a bit. Show it to your friends and family too, they'll think it's a hit!